OpenFGA Studio – An Open Source Authorization Modeling Interface

OpenFGA Studio

Understanding OpenFGA

OpenFGA (Fine-Grained Authorization) is a high-performance authorization engine built for developers and inspired by Google’s Zanzibar paper. It excels in handling complex authorization scenarios with features that make it stand out:

  • Relationship-Based Authorization: Model complex access patterns through relationships
  • High Performance: Process millions of authorization checks per second
  • Flexibility: Support for RBAC, ABAC, and ReBAC models
  • Time-Based Access: Define temporal access rules with built-in support
  • Proven Architecture: Based on Google’s battle-tested Zanzibar system

While OpenFGA Playground provides a hosted application for experimentation, it comes with limitations:

  • Not open source
  • Cannot be deployed in air-gapped environments
  • Limited customization options
  • Dependency on external services

Why This Project?

I built OpenFGA Studio to address these limitations and provide:

  • A fully open-source solution deployable anywhere
  • Enhanced user experience for authorization modeling
  • Complete control over your authorization data
  • Customizable interface for specific needs
  • Seamless integration with existing systems

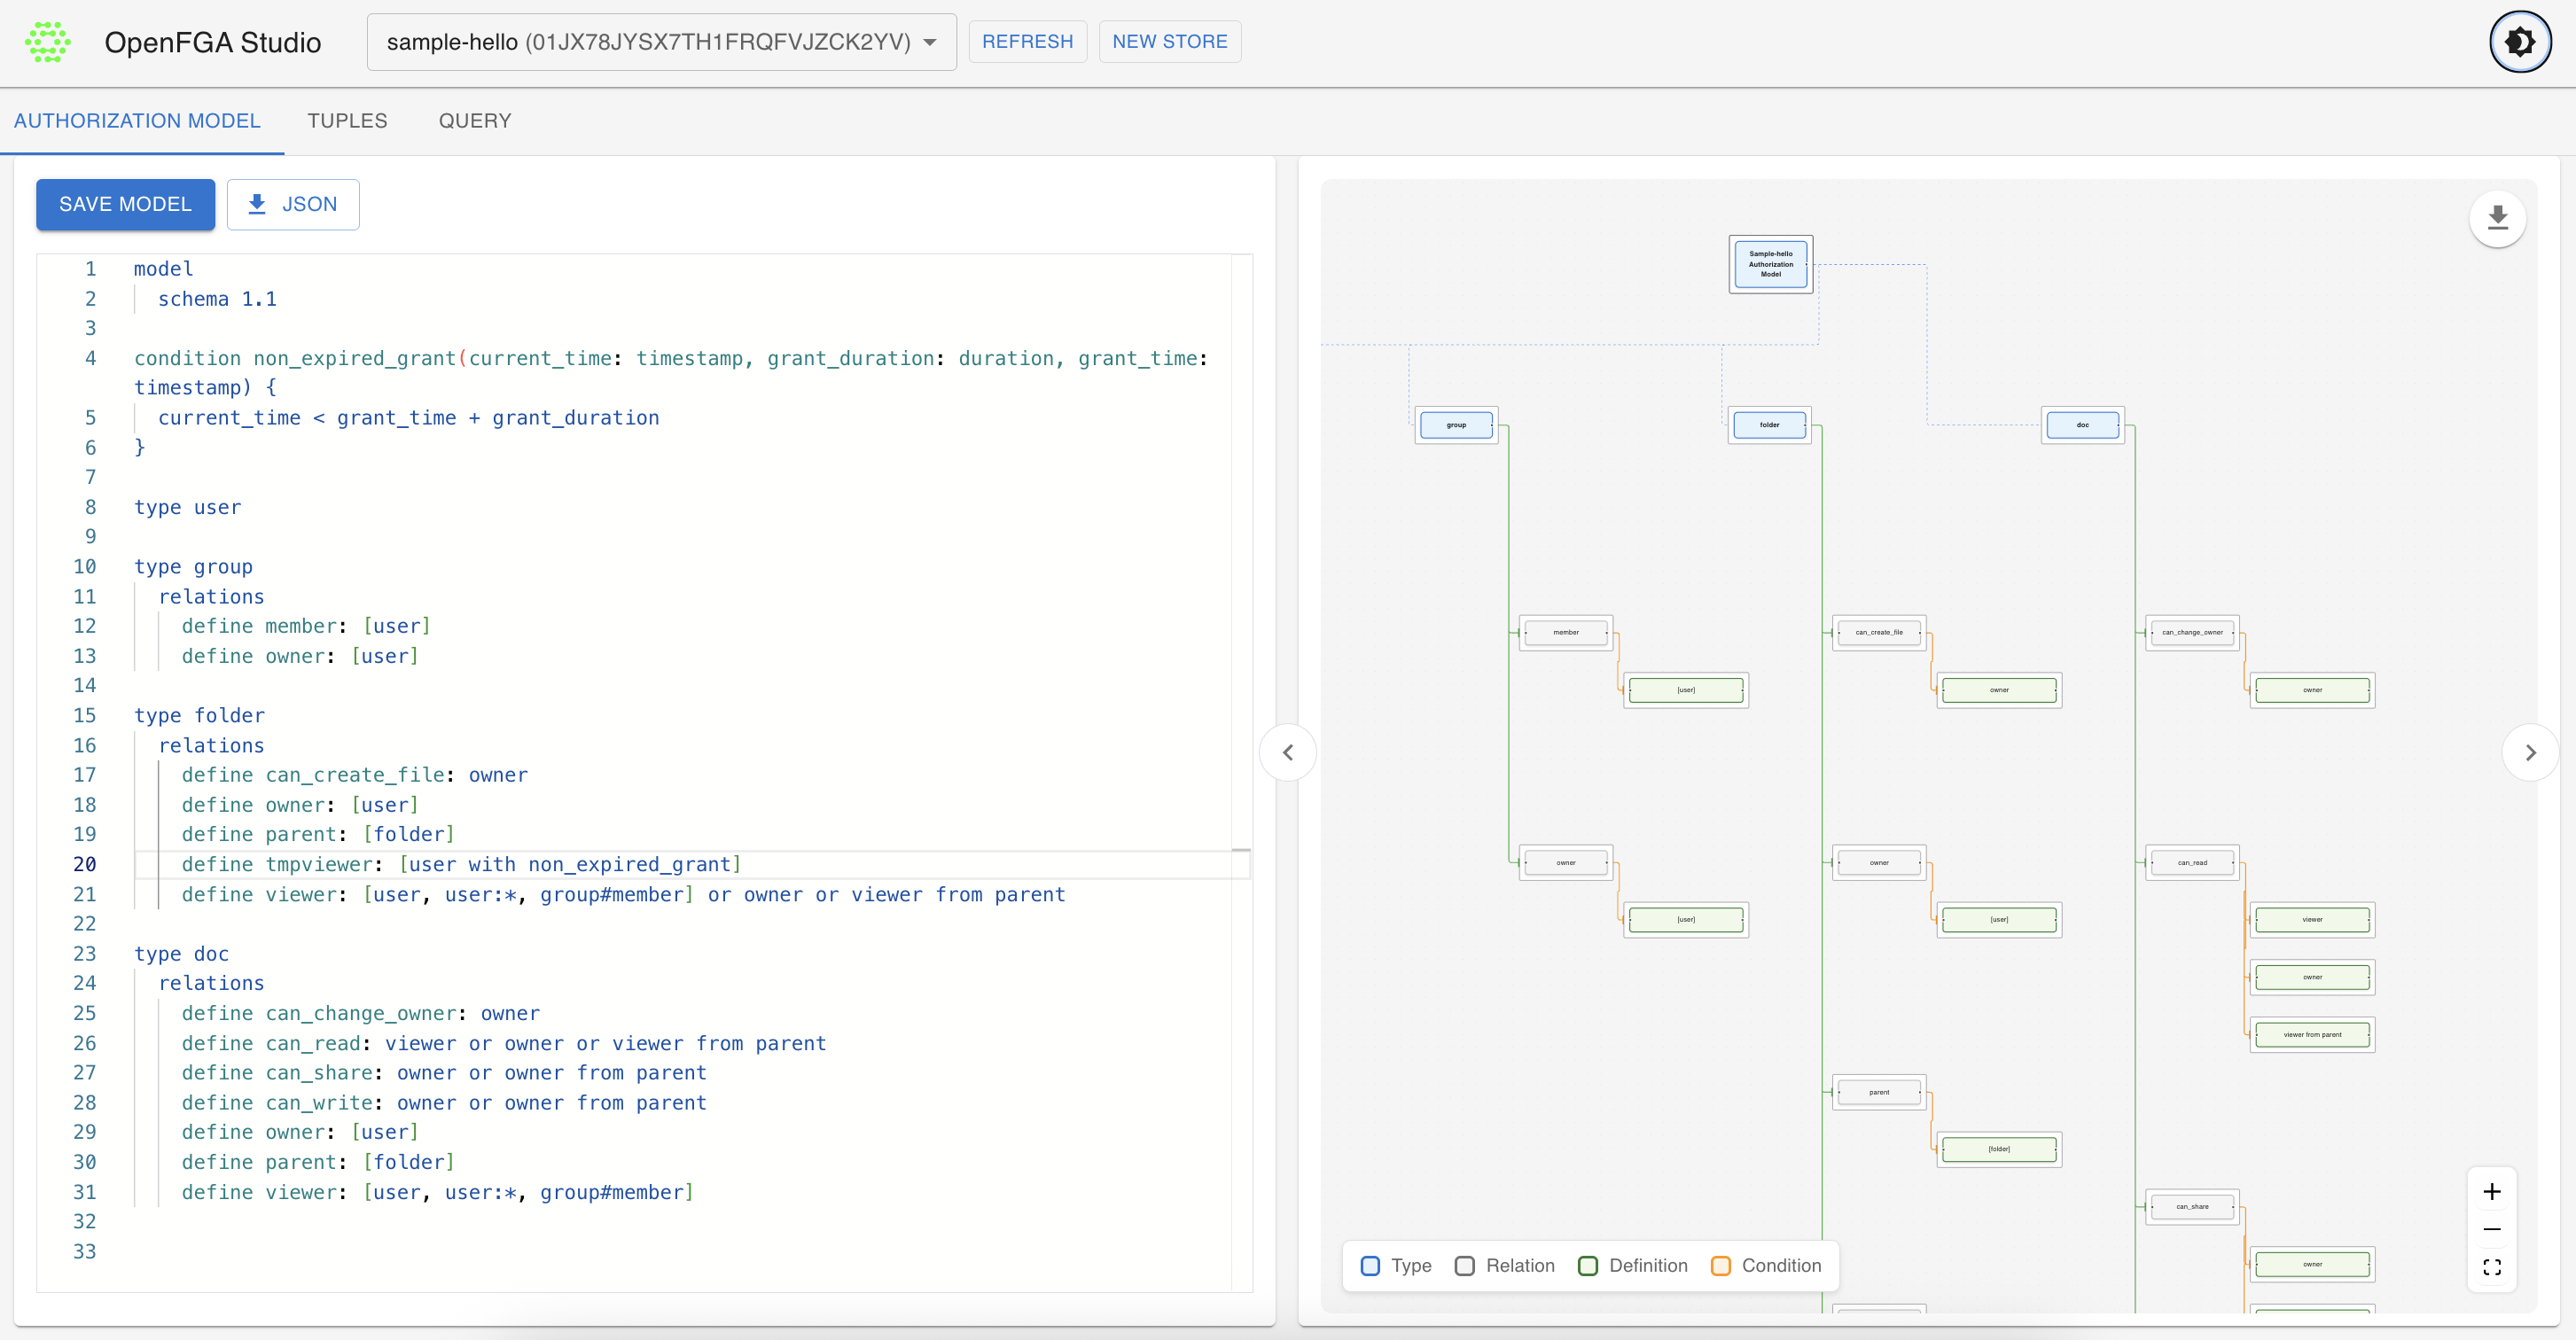
OpenFGA Studio streamlines the process of creating, testing, and managing authorization models, making complex authorization logic more accessible and manageable. Built with modern web technologies including React, TypeScript, and Material-UI, it provides a robust and intuitive interface for working with OpenFGA.

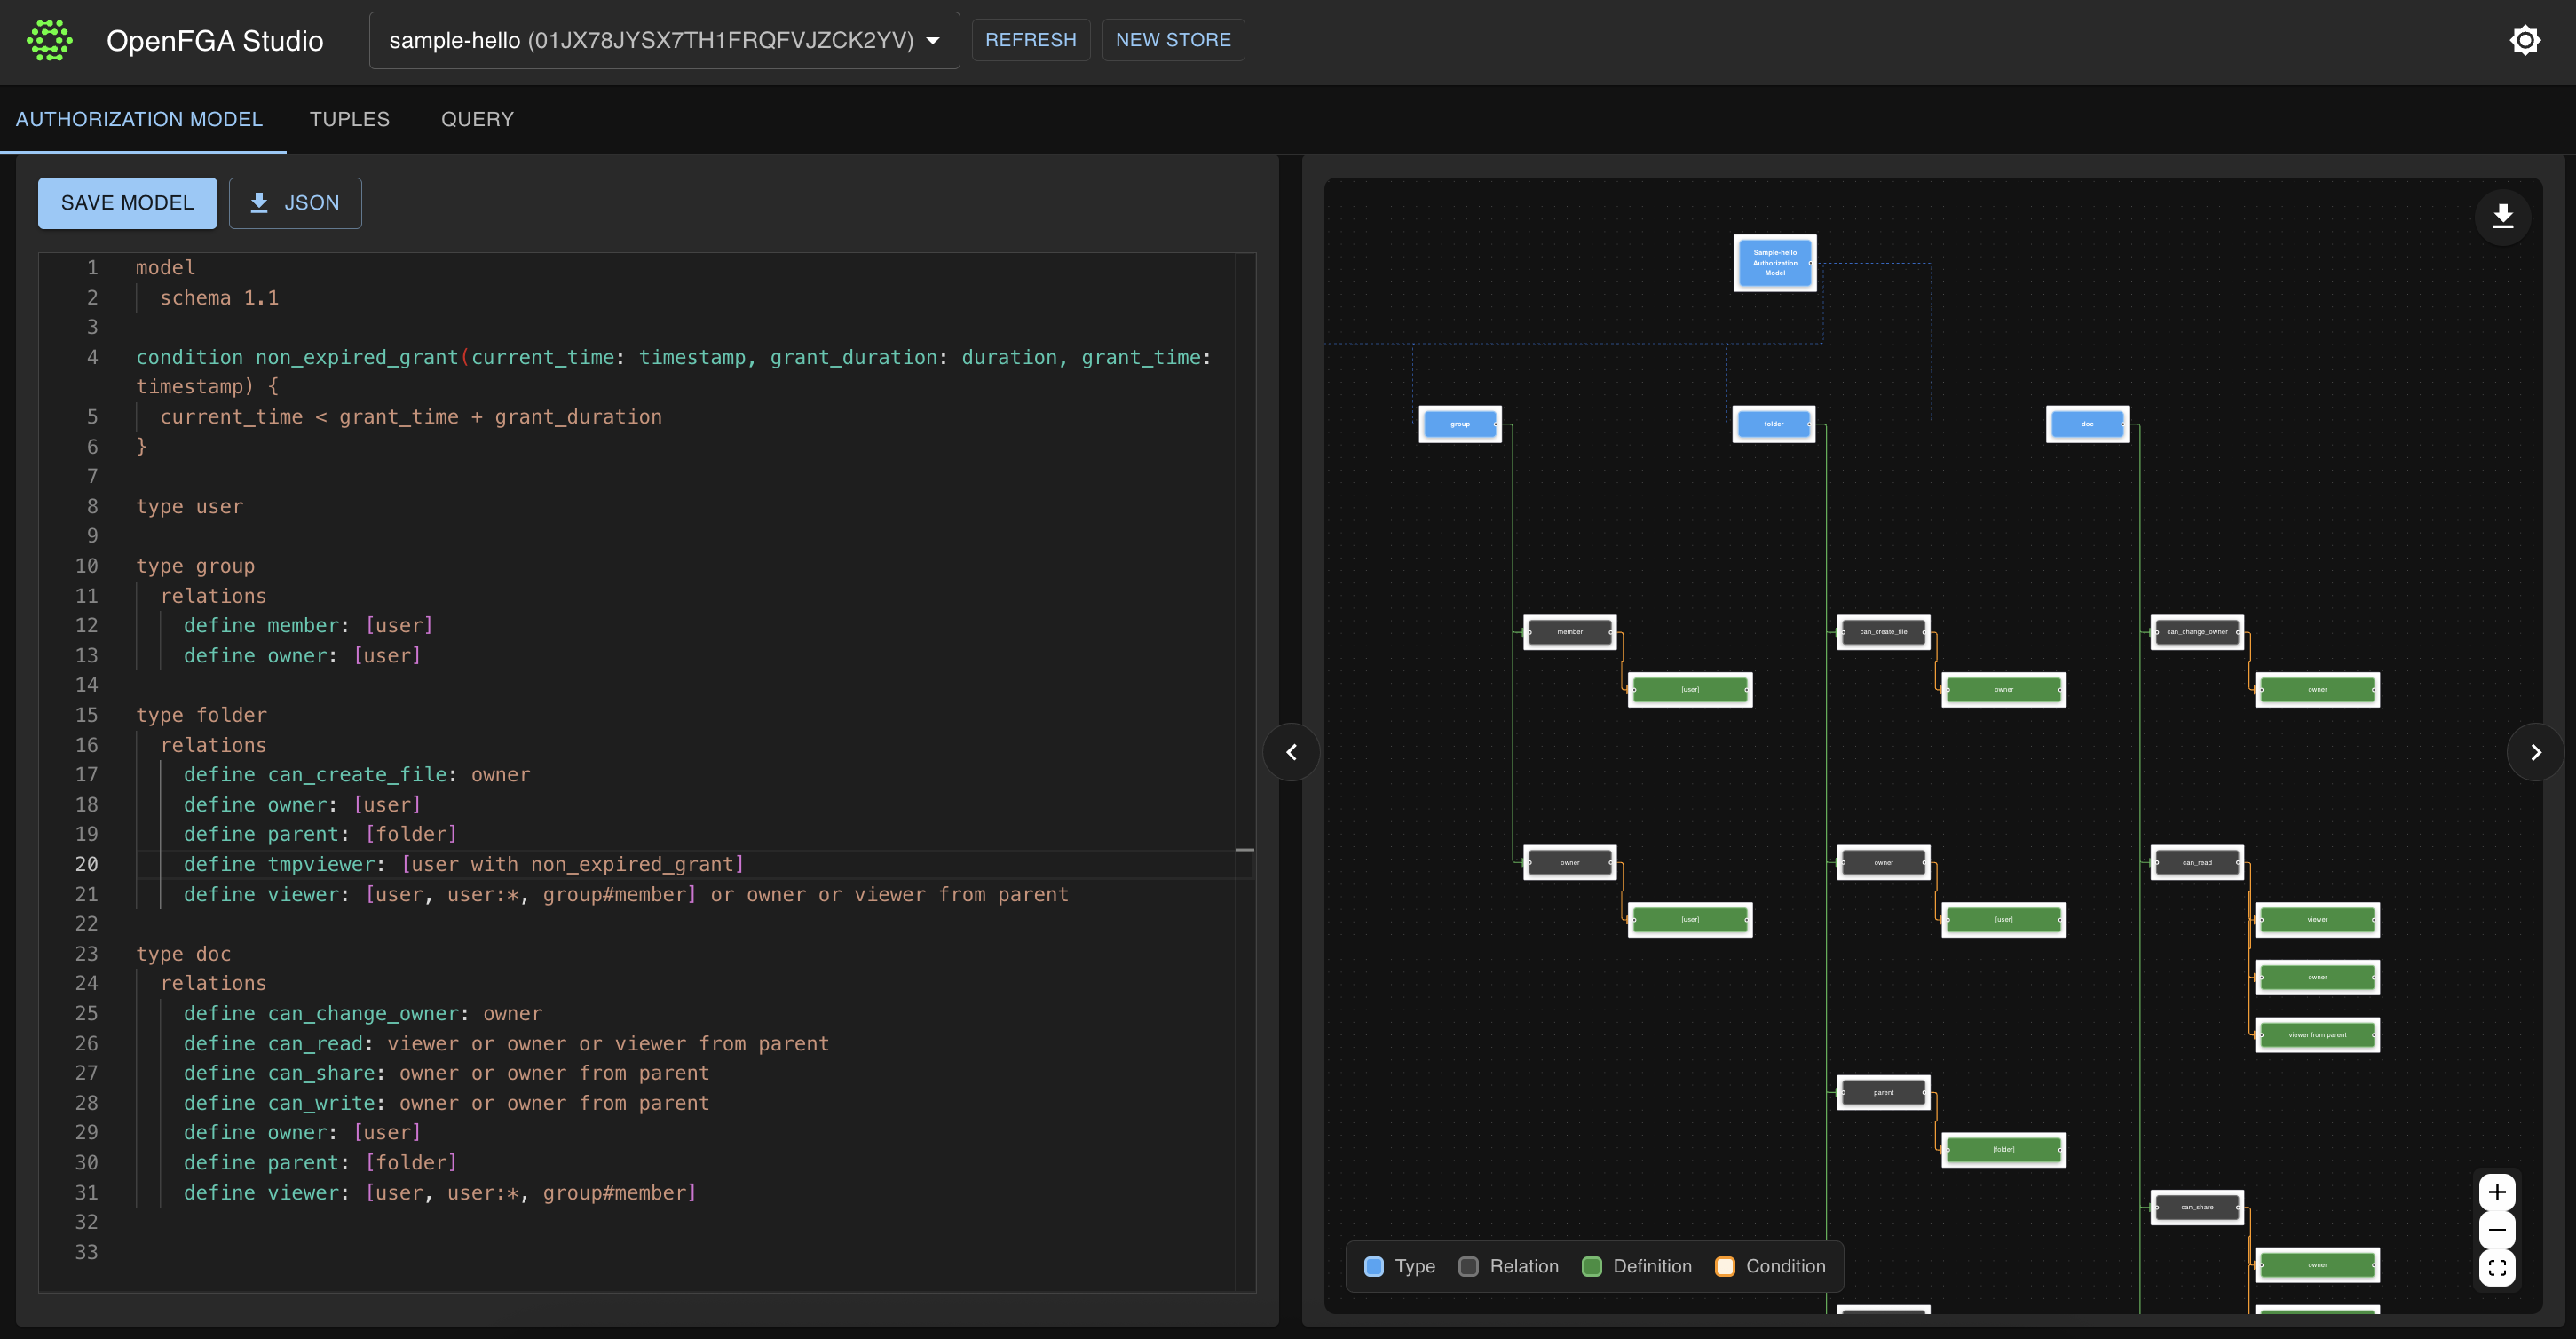
OpenFGA Studio Dark Mode OpenFGA Studio Light Mode

Key Features

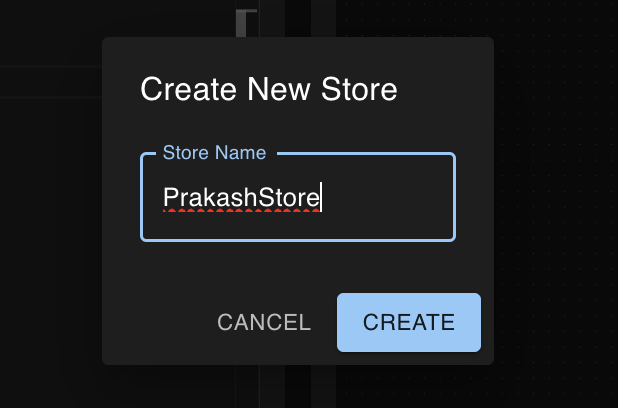
1. Store Management

The interface provides a straightforward way for managing OpenFGA stores. You can:

  • Create new authorization stores
  • Switch between existing stores
  • View and manage store configurations
  • Track model versions and changes

Store Creation Interface

2. Visual Authorization Model Editor

The model editor is a powerful interface for defining authorization rules with features including:

  • Syntax highlighting for better readability
  • Real-time validation against OpenFGA schema
  • Support for both DSL and JSON formats
  • Error highlighting and suggestions
  • Easy switching between model versions

3. Interactive Graph Visualization

Understand your authorization model at a glance with:

  • Visual representation of relationships between types
  • Interactive node exploration
  • Relationship flow visualization
  • Dynamic updates as you modify the model
  • Zoom and pan controls for large models

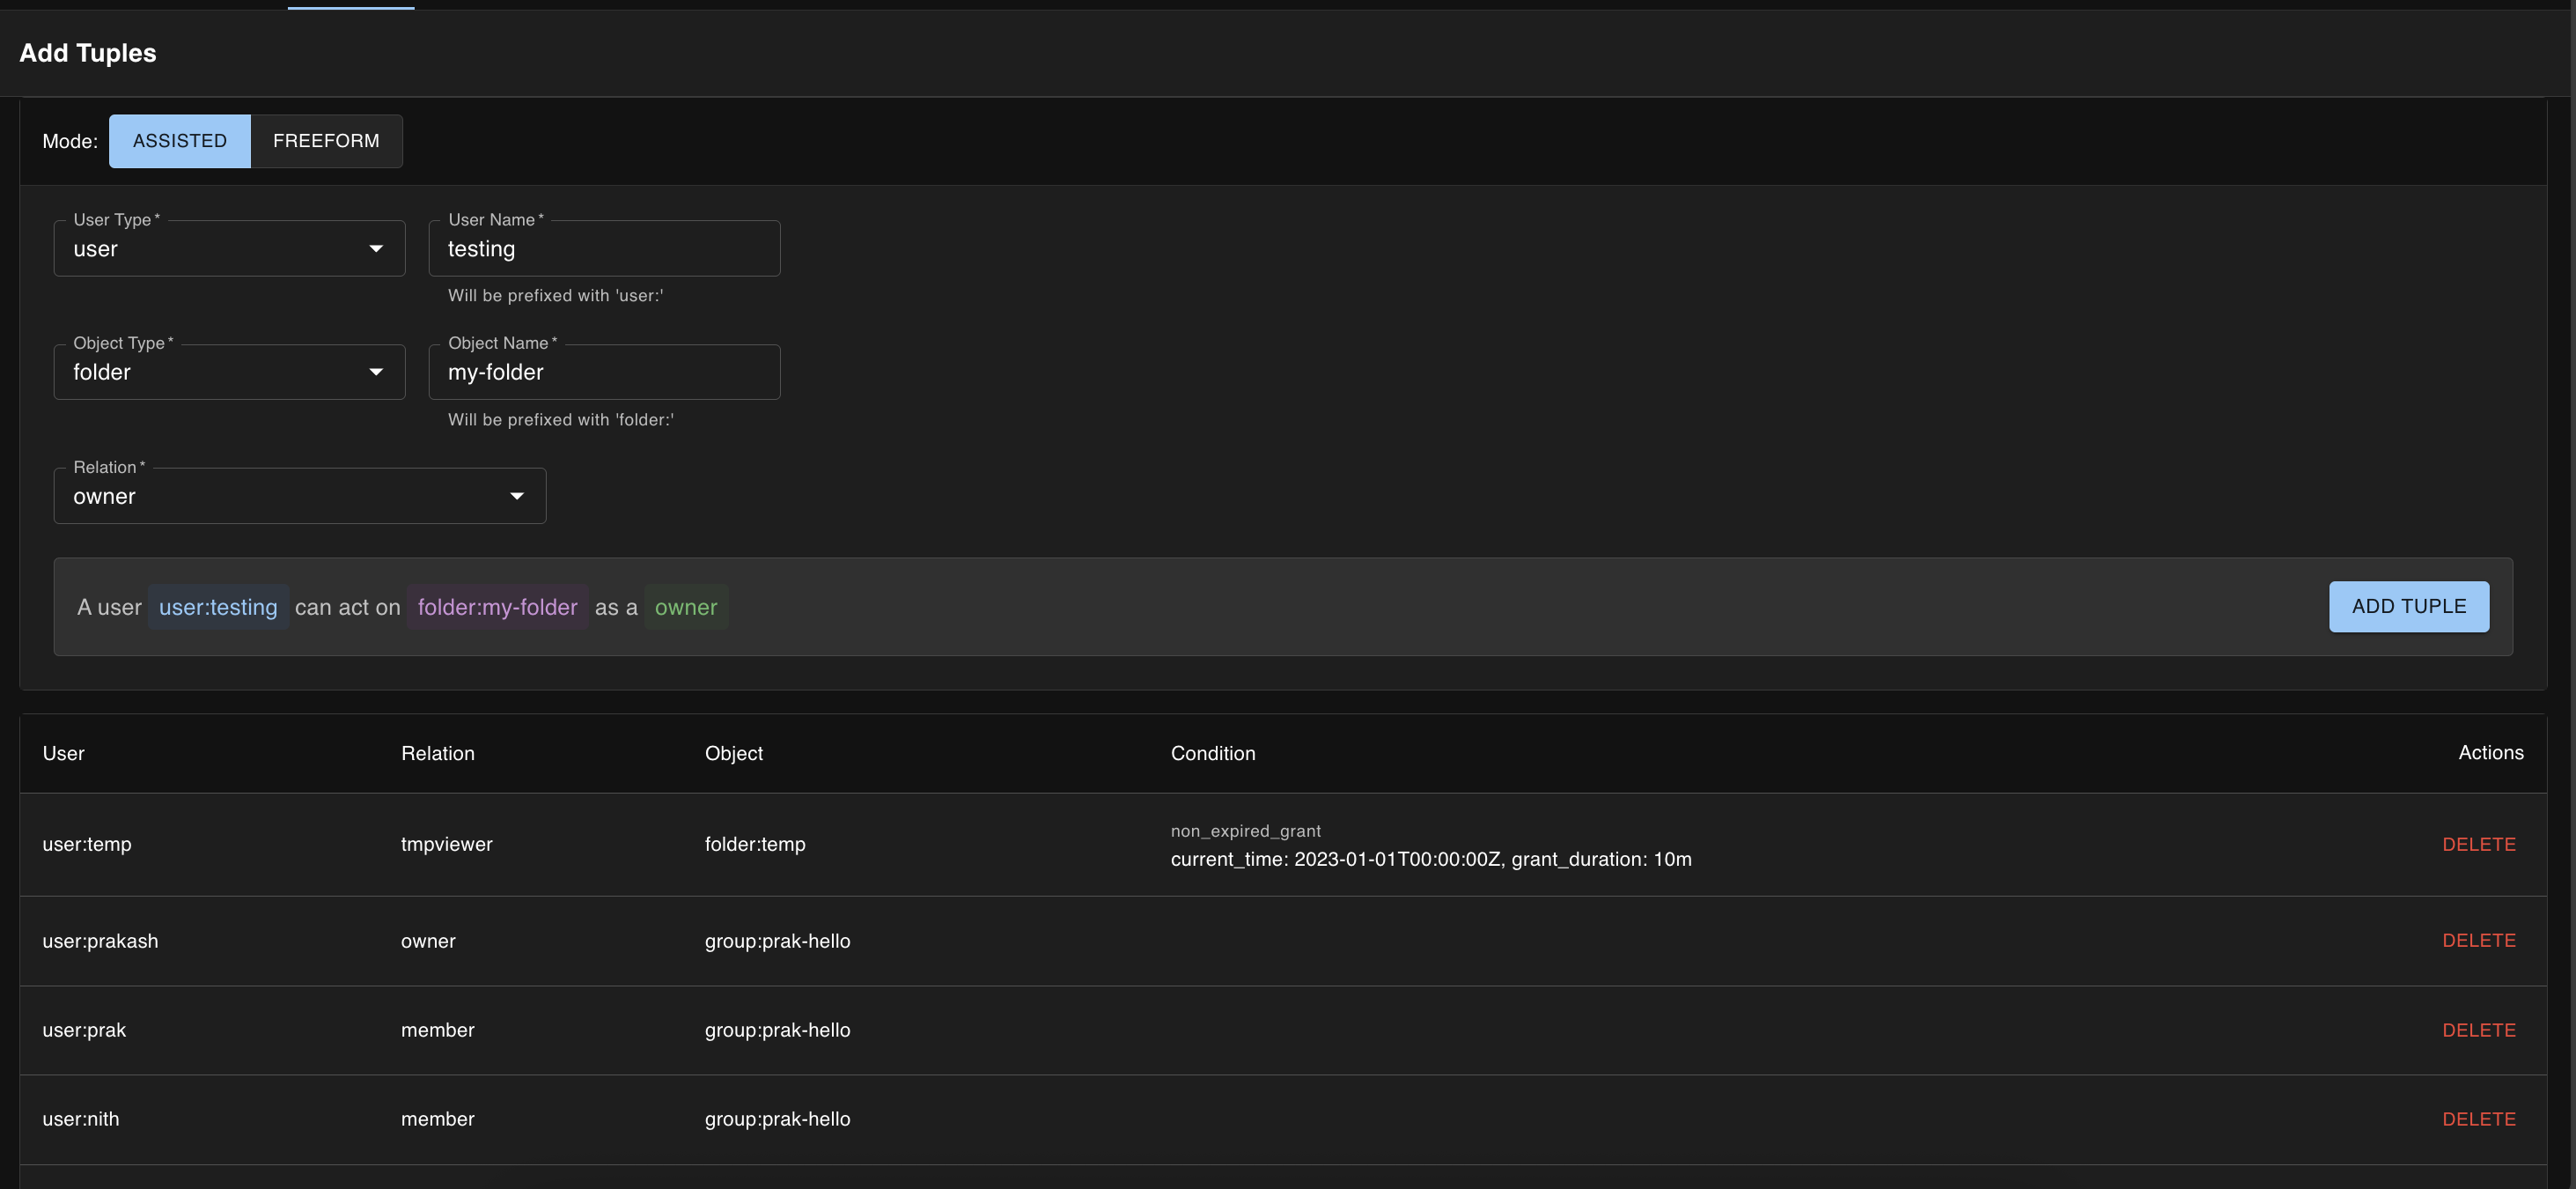
4. Advanced Tuple Management

The tuple management interface makes it easy to define and manage relationships:

Adding Basic Tuple

  • Assisted tuple creation with type suggestions
  • Support for direct (freeform) tuple input
  • Batch operations for efficient management
  • Reverse chronological listing of tuples
  • Quick delete operations

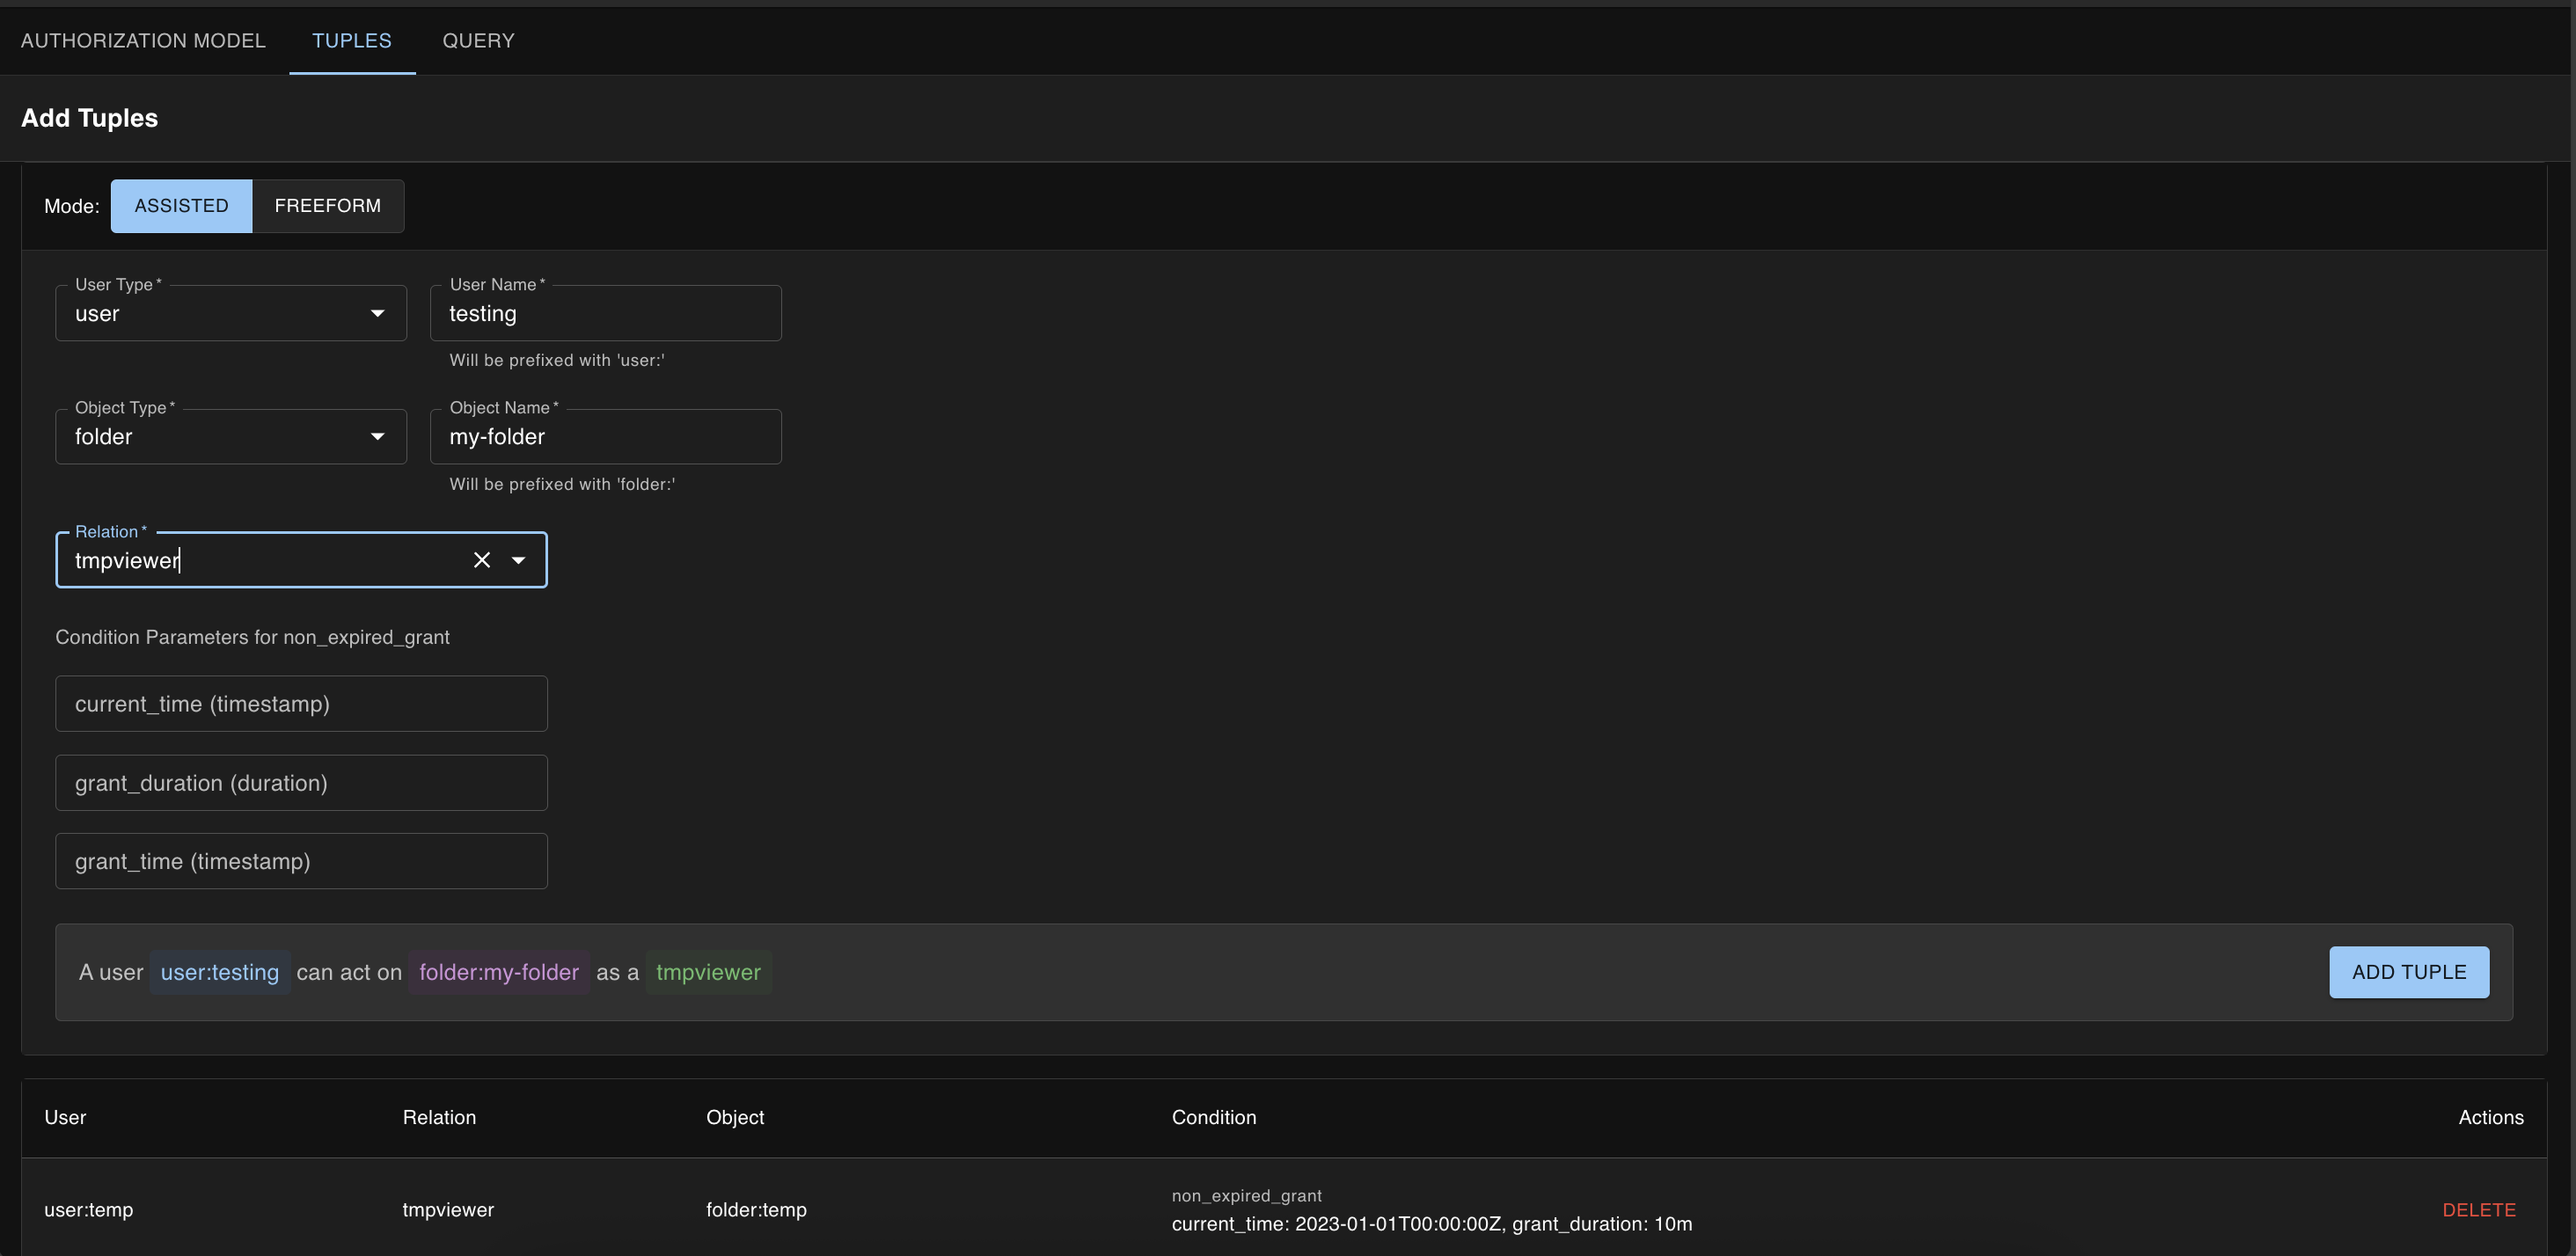
5. Conditional Relationship Support

Handle complex authorization scenarios with conditional relationships:

Adding Tuple with Conditions

  • Dynamic condition parameter inputs
  • Type-aware parameter validation
  • Timestamp and duration support
  • Visual feedback for condition state

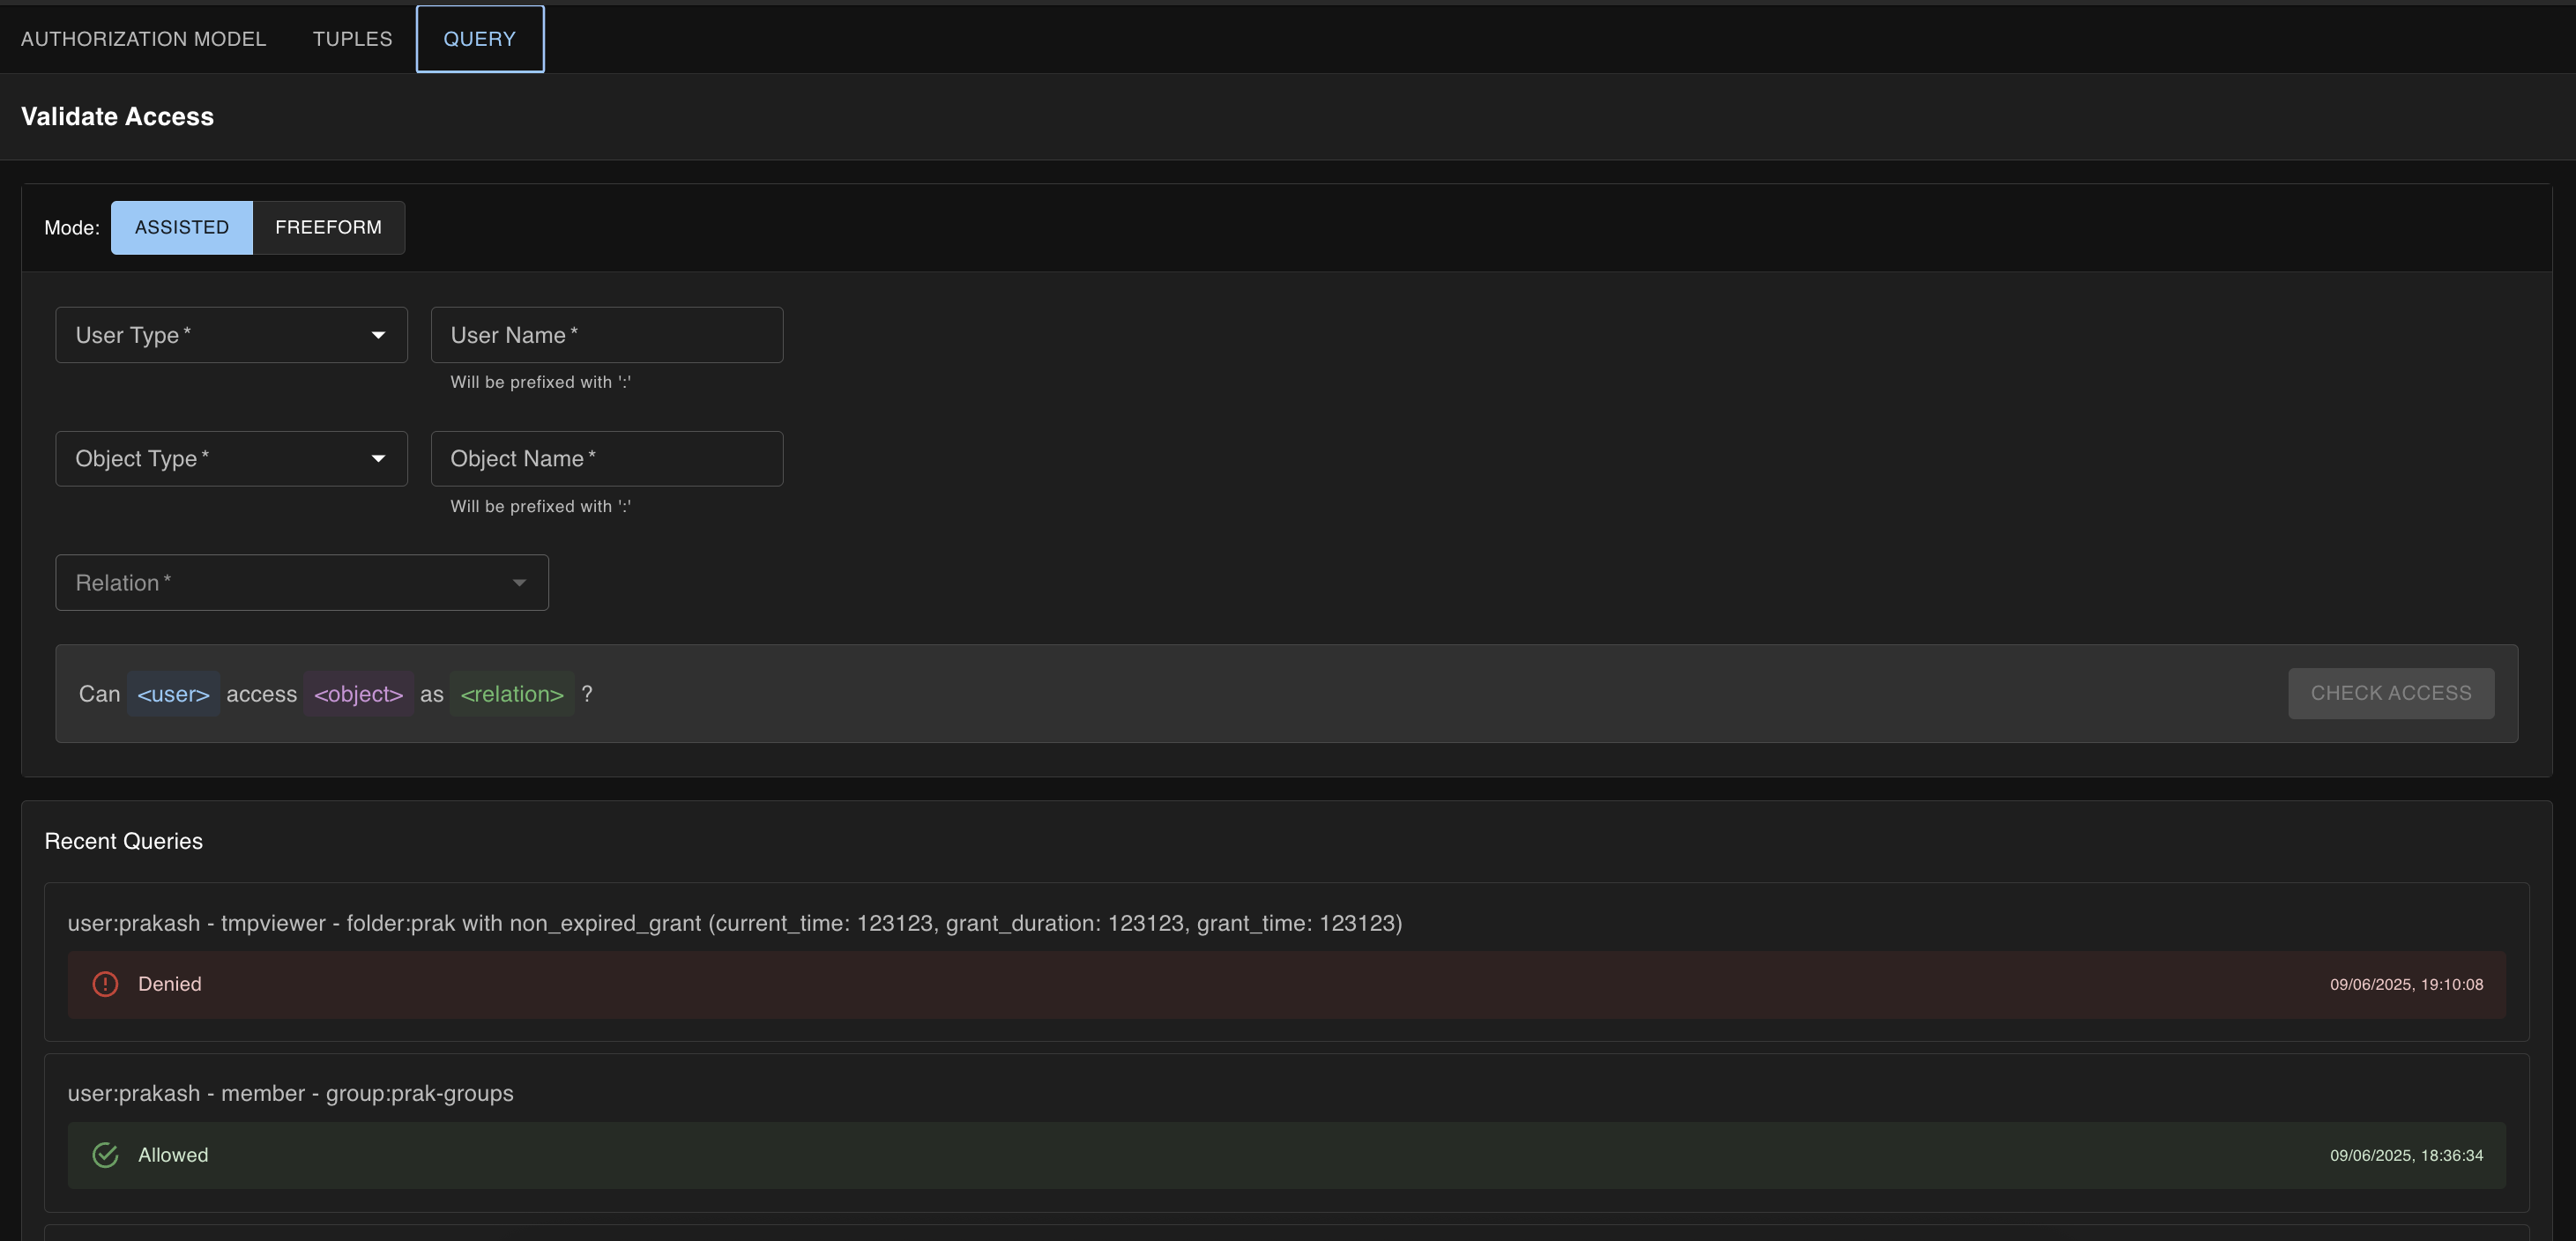
6. Comprehensive Query Testing

Test your authorization rules with an intuitive interface:

Basic Access Validation

Features include:

  • Visual query builder
  • Direct query input support
  • Real-time query validation
  • Historical query tracking
  • Quick query replay

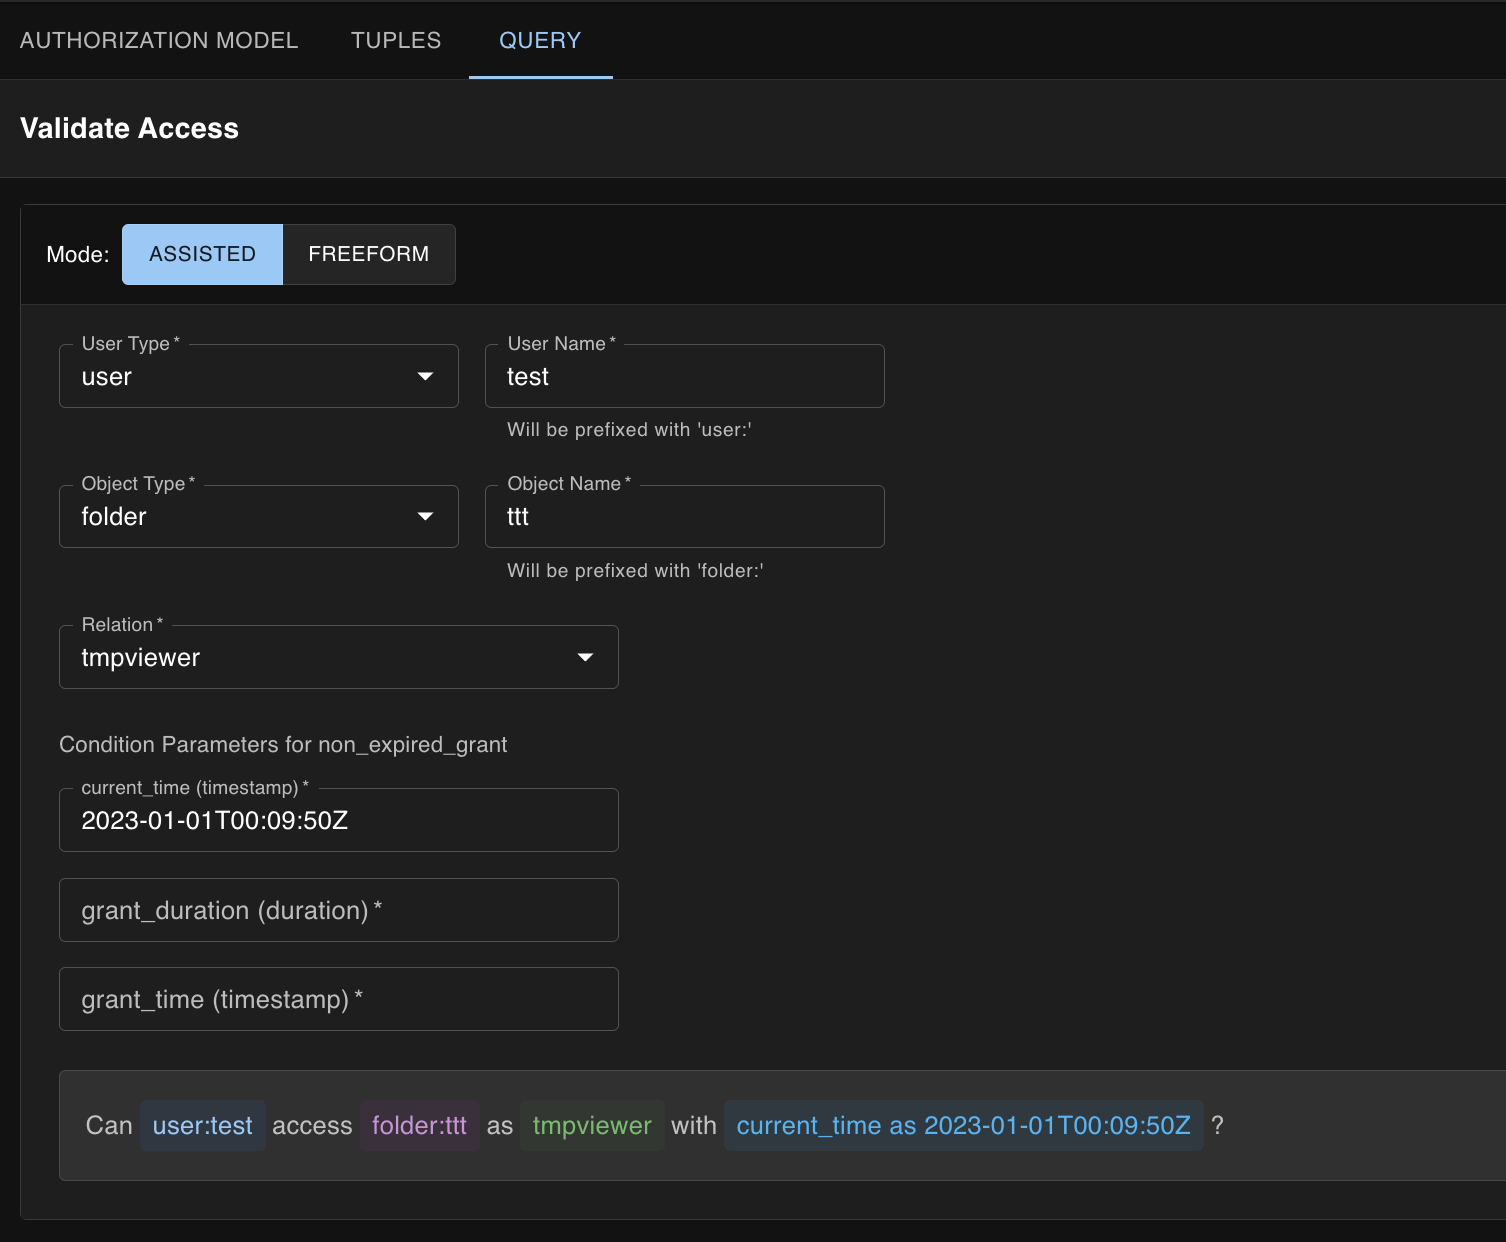
7. Conditional Access Testing

Test complex conditional access patterns:

Conditional Access Validation

  • Test time-based access rules
  • Validate contextual conditions
  • Dynamic parameter inputs
  • Clear success/failure indicators

8. Developer-Friendly Features

OpenFGA Studio is built with developers in mind:

  • Clean, modern UI with dark mode support
  • Keyboard shortcuts for common operations
  • Copy/paste support for all fields
  • Detailed error messages
  • Response timing information

Technical Implementation

OpenFGA Studio is built with modern web technologies:

  • Frontend: React with TypeScript for type safety
  • UI Framework: Material-UI for consistent, responsive design
  • State Management: React hooks and context for efficient state handling
  • Build Tool: Vite for fast development and optimized production builds
  • API Integration: Axios for reliable API communication
  • Graph Visualization: React Flow for interactive model visualization

Common Use Cases

  1. Authorization Modeling

    • Design role-based access control (RBAC) systems
    • Implement attribute-based access control (ABAC)
    • Model relationship-based authorization
  2. Testing and Validation

    • Verify access control rules
    • Test time-based permissions
    • Validate complex conditional access
  3. Development and Debugging

    • Debug authorization issues
    • Prototype authorization models
    • Document access control patterns

Conclusion

OpenFGA Studio simplifies the complex task of fine-grained authorization modeling and testing. Whether you’re designing a new authorization system or maintaining an existing one, this tool provides the features needed to work efficiently with OpenFGA.

The combination of visual tools, intuitive interfaces, and powerful testing capabilities makes it an essential tool for developers working with authorization systems. The tool continues to evolve with new features and improvements based on community feedback and real-world usage patterns.

Feel free to contribute or request features at OpenFGA Studio

Enhancing the VS Code Agent Mode to integrate with Local tools using Model Context Protocol (MCP)

Building a Todo List Server with Model Context Protocol (MCP)

GitHub Repository Node Version MCP SDK

This blog post walks through creating a Todo List server using the Model Context Protocol (MCP), demonstrating how to build AI-friendly tools that integrate seamlessly with VS Code.

🔗 Source Code: The complete implementation is available on GitHub

Table of Contents

The Evolution of AI-Assisted Development

I have been using VS Code with GitHub Copilot for development purposes. The introduction of text-based chat, which brought GPT capabilities directly into the IDE, was revolutionary.

GitHub Copilot and the Local Tools Gap

GitHub Copilot has revolutionized how developers write code by providing intelligent code suggestions and completions. While it excels at understanding code context and generating relevant snippets, there has been a notable gap in its ability to interact with local development tools, intranet KBs, and execute actions in the development environment. This limitation means that while Copilot can suggest code, it cannot directly help with tasks like running commands, managing files, or interacting with local services.

Agent Mode: Bridging the Gap

The introduction of Agent Mode in GitHub Copilot represents a significant step forward in AI-assisted development. It enables Copilot to:

  • Execute terminal commands
  • Modify files directly
  • Interact with the VS Code environment
  • Handle project-specific tasks

This advancement transformed Copilot from a passive code suggestion tool into an active development partner that can help manage your entire development workflow. Here are some powerful capabilities and example interactions:

1. Build and Test Automation

Trigger Maven builds with specific profiles:

"Run mvn clean install with the 'production' profile for my project"

Execute JUnit test suites:

"Execute all JUnit tests in the UserServiceTest class"

Run code quality tools:

"Run ESLint on all JavaScript files in the src directory"
"Start a local Sonar analysis with coverage and security scan"

2. Documentation and Release Management

Generate release documentation:

"Generate release notes for changes between tag v1.2.0 and v1.3.0"

Technical documentation:

"Create a technical design document for the authentication service"
"Update the API documentation in Confluence for the new endpoints"

3. Project Management Integration

JIRA ticket management:

"Create a JIRA ticket for the memory leak bug we found in the login service"
"Convert all TODO comments in AuthService.java to JIRA tickets"

Sprint management:

"Update the status of PROJ-123 to 'In Review' and add a comment with the PR link"
"Show me all JIRA tickets assigned to me that are blocking the current sprint"

4. Cross-Repository Operations

Multi-repo analysis:

"Check if the latest changes in the API repo are compatible with our client library"
"Run integration tests across both the frontend and backend repositories"

While these capabilities demonstrate the power of Agent Mode, they highlight a crucial challenge: the need for external API integrations. Each of these tasks requires:

  • Authentication with external services (JIRA, Confluence, Sonar)
  • Managing different API versions and endpoints
  • Handling various authentication methods
  • Maintaining connection states and sessions
  • Coordinating operations across multiple systems

This complexity creates significant overhead for developers who need to:

  1. Implement and maintain integration code for each service
  2. Handle authentication and authorization
  3. Manage API versioning and changes
  4. Deal with different response formats and error handling

MCP: The New Standard for AI Tool Integration

Model Context Protocol (MCP) emerges as the next evolution in this space, providing a standardized way for AI models to interact with development tools and services. Unlike traditional approaches where AI assistants are limited to suggesting code, MCP enables:

  1. Direct Tool Integration

    • AI models can directly invoke local tools
    • Real-time interaction with development environment
    • Standardized communication protocol
  2. Extensible Architecture

    • Custom tool definitions
    • Plugin-based system
    • Easy integration with existing services
  3. Development Environment Awareness

    • Context-aware assistance
    • Access to local resources
    • Real-time feedback loop

What is Model Context Protocol (MCP)?

Model Context Protocol (MCP) is a specification that enables AI models to interact with external tools and services in a standardized way. It defines how tools can expose their functionality through a structured interface that AI models can understand and use.

Key benefits of MCP that I have personally benefited from:

  • Standardized tool definitions with JSON Schema
  • Real-time interaction capabilities
  • Session management
  • Built-in VS Code integration

More about MCP Architecture Documentation

How MCP Tools Work

Each MCP tool follows a standardized structure:

{
  name: "toolName",
  description: "What the tool does",
  parameters: {
    // JSON Schema definition of inputs
  },
  returns: {
    // JSON Schema definition of outputs
  }
}

When an AI model wants to use a tool:

  1. It sends a request with the tool name and parameters
  2. The MCP server validates the request
  3. The tool executes with the provided parameters
  4. Results are returned in a standardized format

This structured approach ensures:

  • Consistent tool behavior
  • Type safety throughout the system
  • Easy tool discovery and documentation
  • Predictable error handling

Architecture Overview

Here’s how the different components interact in our MCP Todo implementation:

graph TD
    A[GitHub Copilot] -->|Natural Language Commands| B[VS Code]
    B -->|MCP Protocol| C[MCP Todo Server]
    C -->|CRUD Operations| D[(LowDB/Database)]
    C -->|Real-time Updates| B
    B -->|Command Results| A
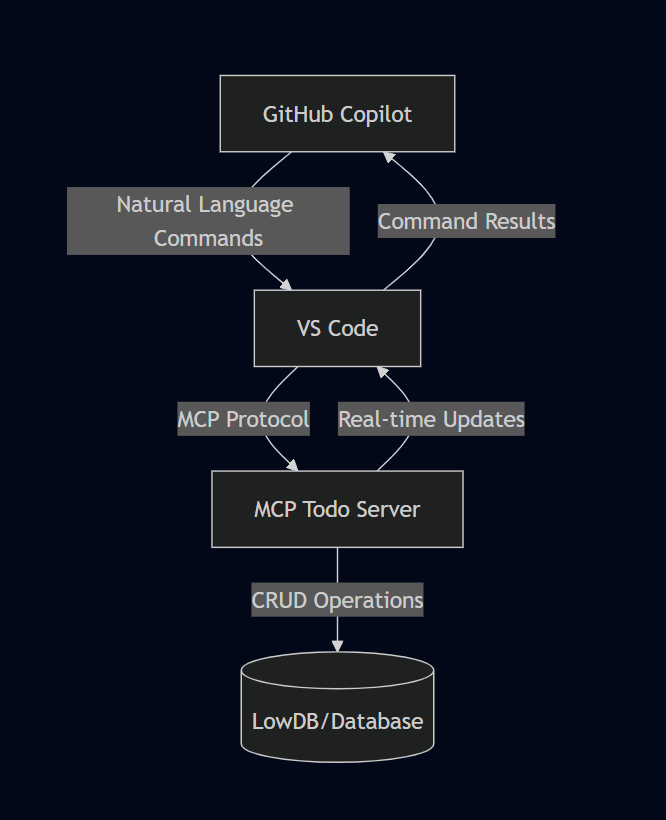
TODO MCP Server Components

Prerequisites

To follow along, you’ll need:

  • Node.js (v22 or higher)
  • VS Code
  • Basic understanding of Express.js
  • npm or yarn package manager

Setting Up the Project

  1. First, create a new project and initialize npm:
mkdir mcp-todo-server
cd mcp-todo-server
npm init -y
  1. Install required dependencies:
npm install @modelcontextprotocol/sdk express lowdb zod

For this demonstration, we’re using lowdb to manage tasks in a JSON file without actual integration with an external system. In a production environment, the lowdb functions can be replaced with actual JIRA CRUD API calls for end-to-end implementation.

  1. Create the basic directory structure:
mcp-todo-server/
├── src/
│   ├── config/
│   ├── tools/
│   ├── utils/
│   └── server.js
└── package.json

Implementing the MCP Server

1. Basic Server Setup

We started with a basic Express server that implements the MCP protocol. The server uses StreamableHTTP for real-time communication and session management.

Key components in server.js:

  • Express server setup
  • MCP SDK integration
  • StreamableHTTP transport configuration
  • Session management for maintaining tool state

2. Database Configuration

We used lowdb, a lightweight JSON database, to persist our todos. The database configuration in config/db.js handles:

  • JSON file storage
  • Basic CRUD operations
  • Data persistence between server restarts

3. Implementing Todo Tools

We implemented four main tools for managing todos:

  1. createTodo

    • Creates new todo items
    • Validates input using Zod schema
    • Returns the created todo with a unique ID
  2. listTodos

    • Lists all todos or filters by completion status
    • Formats output for easy reading
    • Supports real-time updates
  3. updateTodo

    • Updates todo completion status
    • Validates input parameters
    • Returns updated todo information
  4. deleteTodo

    • Removes todos by ID
    • Provides completion confirmation
    • Handles error cases gracefully

VS Code Integration

To enable VS Code to use our MCP server, follow these steps:

  1. Enable Agent mode in VS Code. Click on the drop down just before the model listing and select agent from it.

Enable Agent Mode in VS Code

  1. Then click on the Gear icon next to the speaker icon in the above image and select “Add more tools” then select “Add MCP Server”

Add MCP Server

  1. Then select HTTP or Server-Sent Events and provide the URL based on the server we created. In this case, it’s http://localhost:3000. Then select a name for the server.

Select HTTP or Server-Sent events

Provide name

Select settings

  1. Alternatively you can Press Ctrl+Shift+P (Windows/Linux) or Cmd+Shift+P (Mac) to open the Command Palette. Type “Open Settings (JSON)” and select it and add the following configuration:
{
    "mcp": {
        "servers": {
            "my-mcp-server": {
                "url": "http://localhost:3000/mcp"
            }
        }
    }
}

You can use the 4th step to verify if the server is added correctly after the first 3 steps are done. The User Settings option has Start, Stop, and Restart options. This step helped me identify if there are any issues with the MCP tools server effectively.

Settings JSON

  1. Reload VS Code to apply the changes or use the Start, Stop, Restart options in the settings.json as shown above.

  2. After successful addition of the MCP server, you should see the tools listed when you click the gear icon in the Copilot chat window.

Tools listed successfully

Using the Todo MCP Server

Here are some example prompts you can use in VS Code with GitHub Copilot to interact with the todo server. Each example includes a screenshot of the actual interaction:

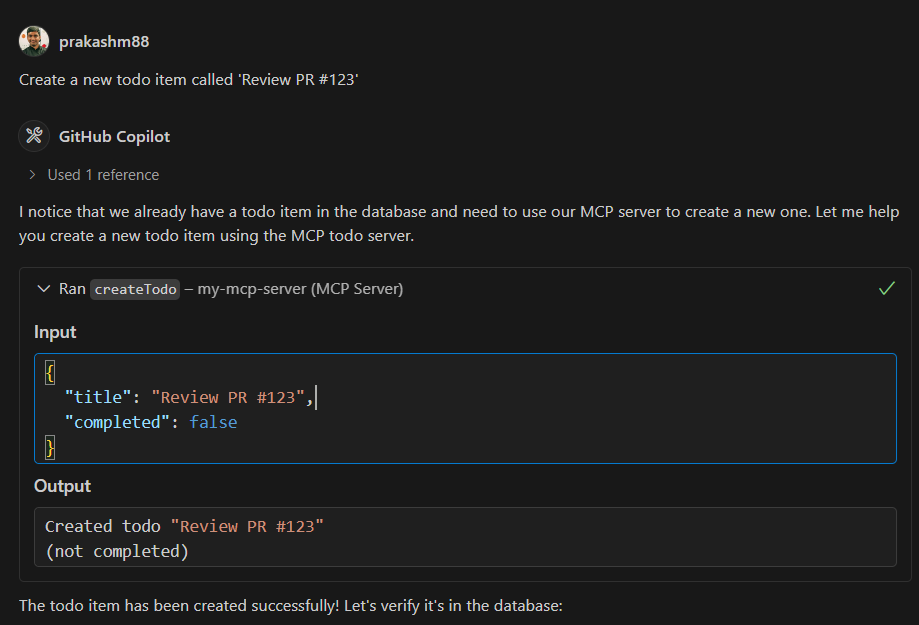
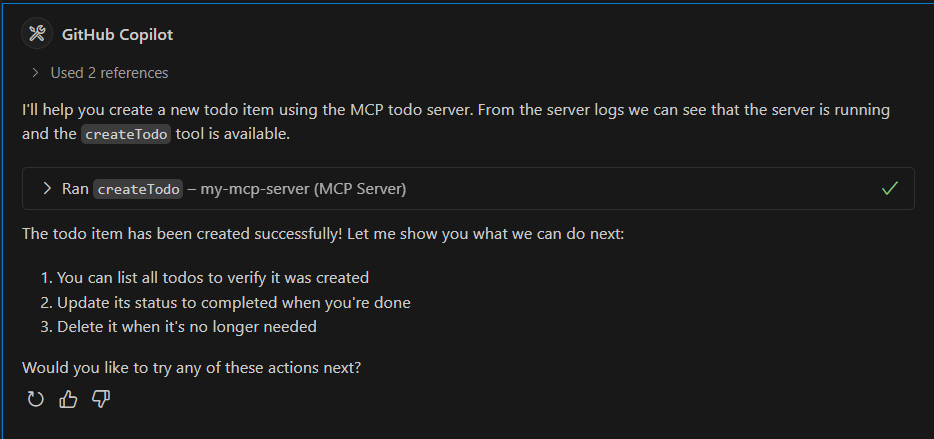
  1. Creating a Todo

    Prompt: "Create a new todo item called 'Review PR #123'"
    Response: Successfully created todo "Review PR #123"
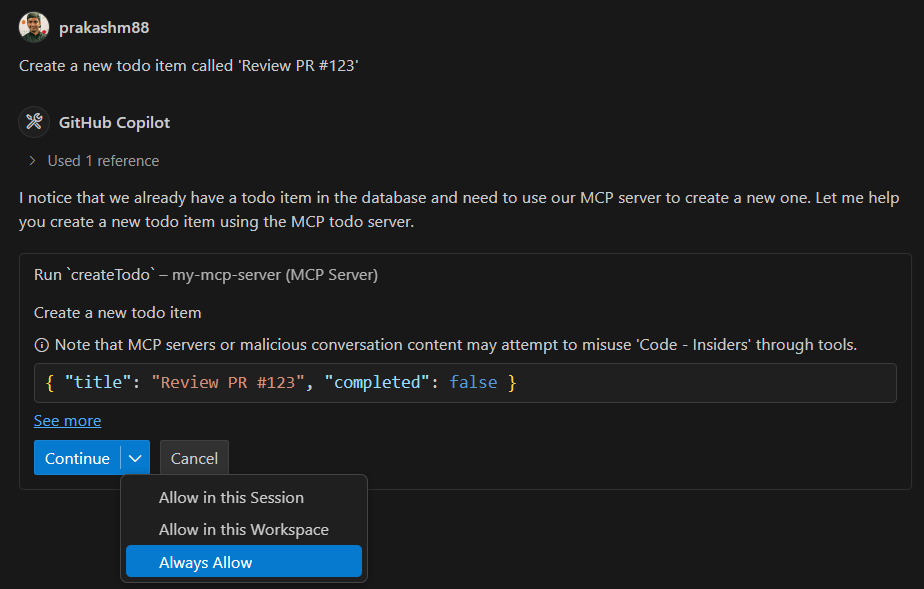
    

    Creating a new todo Execute Add Create TODO success

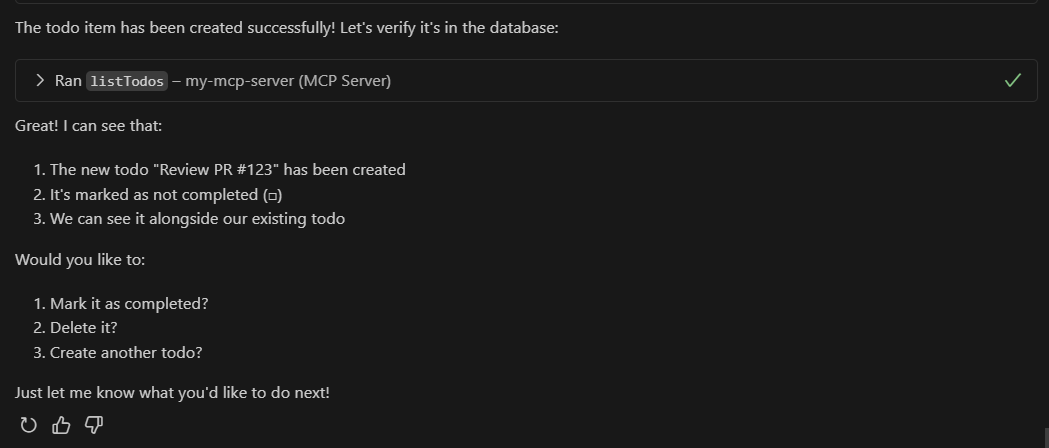
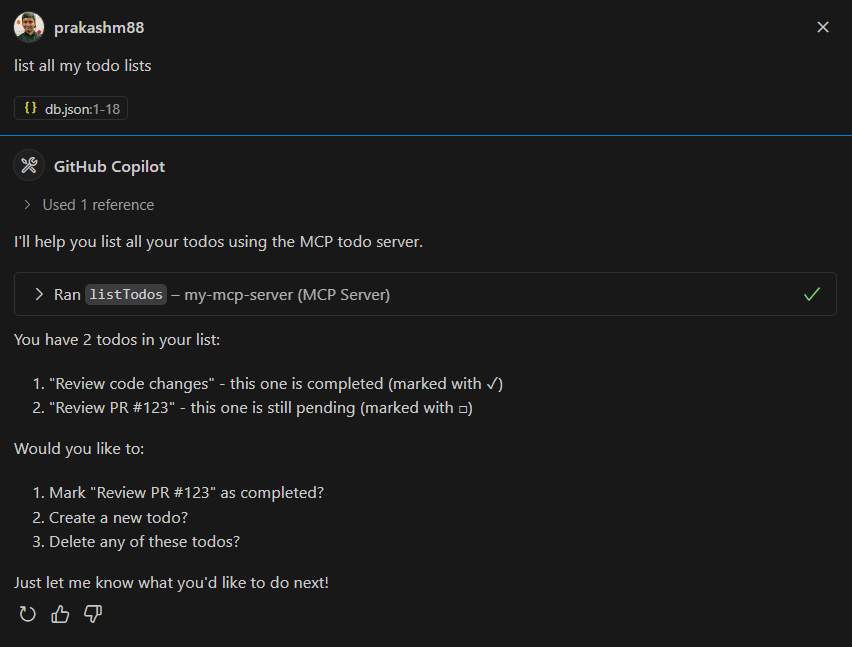
  2. Listing Todos

    Prompt: "Show me all my todos"
    Response: Here are your todos:
    - Review PR #123 (Not completed)
    - Update documentation (Completed)
    - Setup test environment (Not completed)
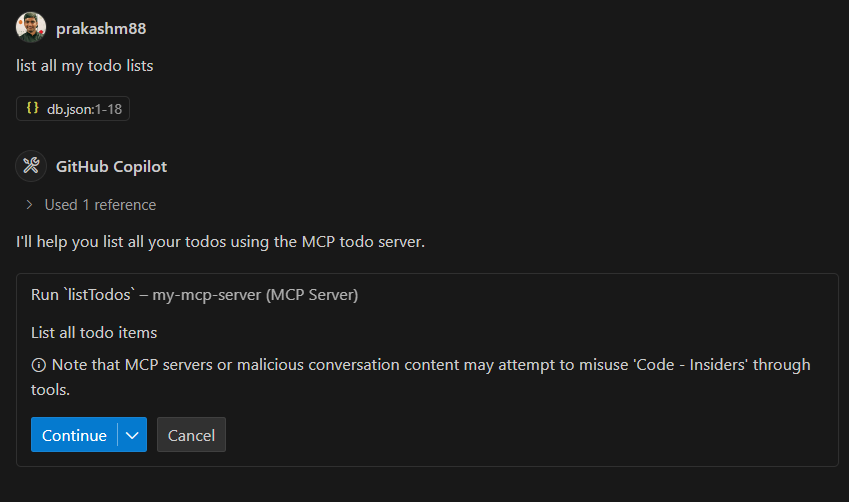
    

    Listing all TODOs execute Listing all TODOs Listing all TODOs

  3. Updating a Todo

    Prompt: "Mark the todo about PR review as completed"
    Response: Updated "Review PR #123" to completed
    
  4. Deleting a Todo

    Prompt: "Delete the todo about documentation"
    Response: Successfully deleted "Update documentation"
    
  5. Filtering Todos

    Prompt: "Show me only completed todos"
    Response: Completed todos:
    - Review PR #123
    

Next Steps and Improvements

Potential enhancements for the project:

  1. Authentication

    • Add user authentication
    • Implement role-based access
  2. Advanced Features

    • Due dates for todos
    • Categories/tags
    • Priority levels
  3. Performance

    • Caching
    • Database optimization
    • Rate limiting
  4. Testing

    • Unit tests
    • Integration tests
    • Load testing

Troubleshooting

Common Issues and Solutions

  1. Server Connection Issues

    • Verify the server is running on port 3000
    • Check VS Code settings for correct server URL
    • Ensure no firewall blocking the connection
  2. Tool Registration Problems

    Error: Tool 'createTodo' not found
    Solution: Check if server is properly initializing tools in server.js
    
  3. Schema Validation Errors

    • Ensure todo items match the required schema
    • Check Zod validation rules in tool implementations
    • Verify JSON payload format
  4. Real-time Updates Not Working

    • Confirm SSE (Server-Sent Events) connection is established
    • Check browser console for connection errors
    • Verify StreamableHTTP transport configuration

Source Code Reference

Key implementation files:

Conclusion

We’ve successfully built a fully functional MCP-compatible Todo server that:

  • Implements CRUD operations
  • Maintains persistent storage
  • Provides real-time updates
  • Integrates seamlessly with VS Code

This implementation serves as a great starting point for building more complex MCP tools and understanding how AI models can interact with custom tools through the Model Context Protocol.

Resources

mcp-todo-server

This project is a simple MCP server that manages a todo list using the Model Context Protocol TypeScript SDK. It provides a RESTful API for creating, updating, and deleting todo items.

Project Structure

mcp-todo-server
├── src
│   ├── resources
│   │   └── todos.js
│   ├── tools
│   │   ├── createTodo.js
│   │   ├── updateTodo.js
│   │   └── deleteTodo.js
│   ├── config
│   │   └── db.js
│   ├── utils
│   │   └── sessionManager.js
│   └── server.js
├── db.json
├── package.json
├── .gitignore
└── README.md

Installation

  1. Clone the repository:

    git clone https://github.com/prakashm88/mcp-todo-server.git
    cd mcp-todo-server
    
  2. Install the dependencies:

    npm install
    

Usage

To start the server, run:

npm start

The server will listen on port 3000.

API Endpoints

  • POST /mcp: Handles client-to-server communication for creating and managing todos.
  • GET /mcp: Retrieves server-to-client notifications.
  • DELETE /mcp: Terminates a session.

Database

The project uses lowdb to manage the todo items, stored in db.json.

Contributing

Contributions are welcome! Here’s how you can help:

  1. Fork the repository
  2. Create a feature branch: git checkout -b feature/my-new-feature
  3. Commit your changes: git commit -am 'Add new feature'
  4. Push to the branch: git push origin feature/my-new-feature
  5. Submit a pull request

You can also:

  • Report bugs by creating issues
  • Suggest improvements through discussions
  • Help improve documentation

Please read our Contributing Guidelines for more details.
Installing OpenStack on AWS

1. Prerequisites – Minimal requirements for hosting in AWS, but not limited to:

  • Ubuntu Server 14.04.3 LTS – 64bit
  • Minimum 2VCPU – Cores
  • Minimum 8 GB RAM for just OpenStack (m4.large), Minimum 16 GB RAM for Sahara and clustering (m4.xlarge)
  • Atleast 40 GB of diskspace

2. Install Ubuntu if you dont have one

3. Verify installed version using

lsb_release -d
free -m
df -h

4. Update to the latest binaries

sudo apt-get update

5. Create a SUDO user – alternatively you can use the /devstack/tools/create-stack-user.sh to create a user after step 8

sudo -i
adduser stack			
	Enter new UNIX password:
	Retype new UNIX password:
	passwd: password updated successfully
	Changing the user information for username
	Enter the new value, or press ENTER for the default
	Full Name []:stack
	Room Number []:
	Work Phone []:
	Home Phone []:
	Other []:
	Is the information correct? [Y/n] Y

6. Add user to SUDOERs group

usermod -aG sudo stack 
echo "stack ALL=(ALL) NOPASSWD: ALL" >> /etc/sudoers

7. Switch to the new stack user

su - stack
check if the user can do sudo operations without password prompts
sudo ls -la /root

8. Switch to user home and install GIT and checkout devstack

cd ~
sudo apt-get install git
git clone https://github.com/openstack-dev/devstack

9. Configure devstack – update local.config and move to /devstack

cd /devstack
cp sample/local.conf .

* Update the passwords for the accounts

ADMIN_PASSWORD=St@ckNewPwd1
DATABASE_PASSWORD=St@ckNewPwd1
RABBIT_PASSWORD=St@ckNewPwd1
SERVICE_PASSWORD=St@ckNewPwd1

* If you are running on a physical machine with a static IP you can update the following property. On AWS its better to leave it commented as the local IP will be changed on each restart, unless the Elastic IP is assigned to the instance

HOST_IP=172.31.26.172

* And add the following line at the end of the file. These entries will add the Sahara plugin (Data Processing) in OpenStack UI

echo "enable_plugin sahara git://github.com/openstack/sahara" >> local.conf
echo "enable_plugin sahara-dashboard git://github.com/openstack/sahara-dashboard" >> local.conf
echo "enable_plugin ceilometer git://github.com/openstack/ceilometer" >> local.conf

10. Start the stack services

./stack.sh

* This takes up sometime and logs will be available at /opt/stack/logs. On successful completion you will find details something similar as below.

=========================
DevStack Component Timing
=========================
Total runtime         1169
run_process            57
test_with_retry         3
apt-get-update          3
pip_install           299
restart_apache_server  10
wait_for_service       11
git_timed             244
apt-get                69
=========================

This is your host IP address: 172.31.26.172
This is your host IPv6 address: ::1
Horizon is now available at http://172.31.26.172/dashboard
Keystone is serving at http://172.31.26.172/identity/
The default users are: admin and demo
The password: St@ckNewPwd1
stack@ip-172-31-26-172:~/devstack$

11. To access the dashboard hit http://172.31.26.172/dashboard in browser (with the ip as displayed in the above step). If you are running in local PC you can directly access with the above url. But if you are running on AWS, this is the internal IP and will not be available to the outside world. In this case, allow HTTP access on 80 port for the outside world and access the service with the Public IP or DNS hostname allocated to your instance. This in my case http://54.23.123.43/dashboard.

Must have Android apps for developers (Non Android developers)

The below list of apps are note rated or ordered in any ways.

1. AndroIRC – An IRC client application
2. Chrome – Mobile browser
3. Mozilla Firefox – Mobile browser
4. SSH/SFTP Server – Exposing your mobile as a SSH/SFTP server
5. AndFTP – FTP client
6. JuiceSSH – SSH client
7. aLogcat/aLogrec – Logger apps to view or save Android logs
8. Network Info II – Shows info about the phone and the current network, Bluetooth, IPv6 and Cell connection
9. kWS – Android Web Server
10. Google Analytics – Mobile client for Google Analytics
11. WordPress – Mobile client for WordPress dashboard
12. Control Panel for cPanel – Mobile client for cPanel Dashboard
13. File Expert – All in one File manager supporting Windows Samba, FTP, SFTP, FTPS, Webdev, Bluetooth OBEX client

Note: The above app list is used by me and has nothing to do with the other users.

Setup your own Social Networking Websites

There a lot of social networking site available in web which includes the Google Plus, Facebook, Twitter etc. Its public and the open to all. But if you wish to Setup your own Social Networking site that is private and for a closed group you can use one of the following Open source scripts.

1. Elgg: Elgg empowers individuals, groups and institutions to create their own fully-featured social environment. Elgg, started in 2004, is an open source social engine which powers all kinds of social environments – from education and business to martial arts and rugby. If you are looking for a professional social intranet or want to run a site for your organisation, Elgg is a great choice. Click here to download.

2. Dolphin: Dolphin is the world’s most advanced community software. Open-source, independent, downloadable, scalable, customizable, full-featured, free software for building social networks, dating sites and web-communities. Loaded with video chat, recorder, video player, forums, groups, events, video messenger, mailbox, desktop app, video sharing, photo sharing, iPhone app and much more. Build your own business or advance your hobby with Dolphin!. Click here to download Dolphin.

3. Jcow: Jcow makes it easy & interesting to create Social Networks and online communities, Build a member community for your existing website, Build a social networking site like facebook/myspace/twitter. Click here to download JCow.

4. Etano: Etano can be used to start up a dating site, a social networking site, a classifieds site or any other type of site involving groups of people, companies, products. Click here to download.

5. Oxwall: Oxwall is used for a wide range of projects starting from family sites and custom social networks to collaboration tools and enterprise community solutions. Oxwall is unbelievably flexible and easy to use PHP/MySQL community software platform. Click here to download.

6. PeoplePods: PeoplePods is a framework that makes it easier to create community or “social” applications. It provides a flexible infrastructure within which members of a site can create, comment upon, and consume content of arbitrary types. Popular social functionality such as friend lists, personalized content views, bookmarking, and voting are automatically available within any PeoplePods application. PeoplePods can be used to build stand-alone sites, or can be layered onto existing sites such as those run using WordPress or other PHP applications. Click here to download.

7. Beatz: Beatz is a free opensource online social networking community script that allows you to start your own favourite artist band website just like Pure Volume. The script is coded in Php, Mysql and licensed under Creative Commons GPL license. In other words, its an online community script for sharing, discussing and learning about new artists and your favorites. Click here to download.

Open Source Micro blogging applications

Twitter is the most famous Microblogging site used by users all over the world. There are some famous Open source microblogging site available. Following are few among the Open source PHP scripts.

1. StatusNet: Previously Laconica, is the engine which runs the popular microblogging site Identi.ca. You can download the same from here.

2. PageCookery: PageCookery is the first public offering of single-user version of the open source microblogging program, PHP + MySQL based architecture is a set of safety, efficiency and stability, to “share”, “discovery” for the concept of Web 2.0 solutions to micro-blog. Click here to download.

3. JaikuEngine: Jaiku was the microblogging site of Google. However, they decided no longer to develop the code but make it open source under the name JaikuEngine.

4. Sharetronix: Sharetronix is the world’s favorite opensource microblogging platform. Sharetronix enables people to exchange ideas and multimedia in real-time. Click here to download.

5. Storytlr: Storytlr offers a single touch point for your online life in your own style. Easily post anything you find interesting, import your web 2.0 stuff and share your life online. Storytlr is an open source lifestreaming and micro blogging platform. You can use it for a single user or it can act as a host for many people all from the same installation. Click here to download.

6. Jisko: Jisko is a light-weight open-source microblogging system that allows you to stay in contact with the people you want. Click here to Download.

7. WordPress: The WordPress is a popular blogging tool. But the Power of wordpress can be derived to work as a Microblogging application with the help of a simple theme. P2 WordPress Theme converts the Powerful WordPress into a Microblogging tool. Click here to download.

8. Yonkly: Yonkly Open Source twitter-clone and microblogging platform developed on the asp.net mvc framework. It is the famous Open Source app available in the Dot Net side other than the PHP scripts. Click here to Download.

Printing Complex Layouts in Adobe Flex – FlexPrintJob

I have come across a basic need for printing a complex layout in the Adobe Flex. After a long search i thought the following will be helpful to all if shared.

Requirements:

1. My layout has the following. Header (Fixed, to be shown in all page.), First Page Header (Displayed only in single page), DataGrid with data rolling out to more than one page, Fixed footer following the DataGrid and a Footer that come only in last page of the Printed output.
2. I am given only the outer most component object and list of all ids of the following components.
3. No server side support is available.

Problems:

1. My DataGrid is not accessible directly.
2. Complex layout and needed Paginationrn3. Fixed, floating header and footers.

Solution:

With reference to the Adobe Live docs, the solutions is almost near except to the complex structure.
rnI have created a Template that holds all the data to be iterated in the report. I contains the sections like Fixed Header, Floating Header, DataGrid, Fixed Footer, Floating Footer as follows.

1. PrintTemplate.mxml

<s:VGroup id="allPageHeader" width="100%" />
< s:VGroup id="firstPageHeader" width="100%" />
< mx:PrintDataGrid id="printDataGrid" width="100%" />
< s:VGroup id="allPageFooter" width="100%" />
< s:VGroup id="lastPagefooter" width="100%" />

2. PrintSample.mxml

protected function doPrint(outerGroup:DisplayObjectContainer, fixedHeaderIDs:ArrayCollection, floatHeaderIDs:ArrayCollection, dataGridId:String, floatFooterIDs:ArrayCollection , fixedFooterIDs:ArrayCollection):void{...}

Here we have to pass the list of IDs of the sections as we need to the doPrint method as follows.

doPrint(outerGroup, fixedHeaderIDs, floatHeaderIDs, dataGridId, fixedFooterIDs, floatFooterIDs);Completing the rendering the print object will be sent to printer and a popup will be shown.

Source Code: Printing in Adobe Flex

Update:

In the above example, if the Printout is taken with the printAsBitmap set to false, then there will be thick line under the header of the DataGrid ie, the PrintDataGrid. To solve this problem you have to use a Header Renderer and set a background color or Image for the header as follows.

<?xml version="1.0" encoding="utf-8"?>
< s:SparkSkin xmlns:fx="http:/s.adobe.com/mxml/2009" xmlns:s="library:/s.adobe.com/flex/spark" xmlns:mx="library:/s.adobe.com/flex/mx" > < s:Rect left="0" right="0" top="0"> < s:fill> < s:BitmapFill source="@Embed(''header.png'')"/> 
< /s:fill> < s:stroke> < s:SolidColorStroke color="grey" /> 
< /s:stroke> < /s:Rect>< /s:SparkSkin>

Save the file as SampleSkin and add this skin to the headerBackroundSkin property of PrintDataGrid in the PrintTemplate as follows.

<mx:PrintDataGrid id="printDataGrid" width="100%" headerBackgroundSkin="SampleSkin" />

This will resolve the issue and set a neat header to the DataGrid in the print.

Open Source Softwares – Top alternatives for proprietary softwares – Part 2


Part 1  –  Part 2  


  Famous Proprietary Programs   Open Source Alternatives   Download URL

Mail Servers & Mail Clients
16. Microsoft Exchange Server, IBM Lotus Domino   Zimbra, SoGo, Open-Exchange, OpenGroupware   Zimbra, SoGo, Open-Exchange, OpenGroupware
17. Microsoft Outlook   Evolution, SeaMonkey, Thunderbird, Eudora   Evolution, SeaMonkey, Thunderbird, Eduora

Multimedia, Video & Audio
18. Apple iTunes, Windows Media Player, Winamp   Amaroke, aTunes, SongBird   Amaroke, aTunes, SongBird
19. CyberLink PowerDVD and InterVideo WinDVD   VLC media player, Media Player Classic, MPlayer   VLC media player, Media Player Classic, MPlayer
20. Adobe Soundbooth, Sony Sound Forge   Audacity, Ardour, DarkWave Studio, EcaSound   Audacity, Ardour, DarkWave Studio, EcaSound

Browsers
21. Internet Explorer, Safari, Opera   Amaya, Mozilla Firefox, Chromium, K-Meleon, Konqueror, Mozilla, Mozilla Firefox, SeaMonkey   Mozilla, Mozilla Firefox, SeaMonkey, K-Melelon, Amaya, Chromium, Konqueror, Google Chrome

Networking Tools
22. Check Point VPN-1, Citrix Presentation Server   TightVNC, UltraVNC, OpenVPN   TightVNC, UltraVNC, OpenVPN
23. CommView   Wireshark, Snort   Wireshark, Snort
24. CuteFTP, FTP Commander   FileZilla, net2ftp, WinSCP   FileZilla, net2ftp, WinSCP

System Tools
25. Nero Multimedia Suit   DVD Flick   DVD Flick
26. Nero Burning ROM   K3B, InfraRecorder   K3B, InfraRecorder
27. Symantec Veritas NetBackup, Nero Back it up and burn   Amanda, Bacula, StorageIM   Amanda, Bacula, StorageIM
28. PKZip, WinRAR, WinZip   7-Zip, The Unachiver, WinUHA, PeaZip   7-Zip, The Unachiver, WinUHA, PeaZip
29. Syamntec Partion Magic, Symantec Ghost   Partimage, Clonezilla   Partimage, Clonezilla
30. VMware Server ESX   VirtualBOx, Cooperative Linux, OpenVZ   VirtualBOx, Cooperative Linux, OpenVZ
Part 1  –  Part 2  

Open Source Softwares – Top alternatives for proprietary softwares

Open source software is software whose source code is published and made available to the public, enabling anyone to copy, modify and redistribute the source code without paying royalties or fees. Open source code evolves through community cooperation. These communities are composed of individual programmers as well as very large companies. Click Here to learn more about Open Source Softwares.

The Open Source softwares get developed rapidly as the development involves developers from individual to lage companies. Thus the Open Source softwares are gaining phase and becoming a competitive products to that of the costly and proprietary softwares in the market. Here is a collection of softwares that stand as the great alternatives to the Proprietary gaints.


Part 1  –  Part 2 
 
  Famous Proprietary Programs   Open Source Alternatives   Download URL

Operating Systems
1. Microsoft Windows Operating Systems   Linux Distributions (Ubuntu, Fedora, Mandriva etc.), Google Chrome OS, OpenSolaris, and more.   Ubuntu, Fedora, Mandriva, Chrome OS
Office Suites and Tools
2. Microsoft Office Suite, Star Office   OpenOffice, LibreOffice, KOffice, GNOME Office, Feng Office   OpenOffice, LibreOffice
3. Adobe PDF Evince, Foxit Reader, Sumatra PDF Evince, Foxit Reader, Sumatra PDF
4. Mactopia NeoOffice NeoOffice
5. MathWorks MATLAB Scilab Scilab
6. Microsoft Visio Dia, ArgoUM, StarUML Dia, ArgoUM, StarUML
7. Adobe Acrobat PDFCreator, OpenOffice PDFCreator, OpenOffice
Production and Development Tools
9. Adobe Photoshop   Paint.Net, Gimp, GimpShop, Inkscape   Paint.Net, GIMP, GIMPShop, Inkscape
10. AutoCAD Archimedes Archimedes
11. Adobe Dreamweaver NVU (now KompoZer), BigFish, Amaya KompoZer, Last Official Release of NVU, BigFish, Amaya
12. Adobe Flash OpenLaszlo, Synfig Adobe Flex, OpenLaszlo, Synfig
13. UltraEdit-32, EditPlus Notepad++, SciTE, jEdit Notepad++, SciTE, jEdit
14. TruSpace,
Autodesk 3ds Max
Blender Blender
15. Microsoft Project Open Workbench Open Workbench
       
Part 1  –  Part 2